It really makes you feel better – but it must be a small cupboard!
Take control in one small way
Taking control in one area makes you feel able to cope in other areas.
Karen Rasmussen told us that years ago in a NewDAY Ladies Meeting and I have never forgotten it. I don’t know why it made such an impression om me because I don’t often feel overwhelmed – so maybe it is for all you people out there – especially women. Apparently it works more for women than for men – but try it and see if it works for you. It can’t hurt and it might make a world of difference. At least you will have one tidy cupboard out of it.
Don’t take on an enormous cupboard. It must be a project you can handle in the state you’re in. It doesn’t even have to be a cupboard. Maybe for you it can be to weed a garden bed, paint a box, stick cards in a scrapbook, clean out a sewing box, polish all your shoes… I tidied my kitchen cutlery tray.
If you often refer to something that has to stand out from the text, like a book title, newspaper name or song title, the convention is to use italics, rather than inverted commas. If you use the same names over and over again, you can save time and energy (and probably increase accuracy) by creating shortcuts.
Book title, newspaper name or song title
Type the name of the item the way you want it, with capital letters and italics.
Note: It is better to use an italic character style reserved for the names, like Subtle Reference, rather than simply italicising the name; if necessary, change the style to the format you want. Only include “The” or “A” at the beginning of the name if it is part of the legal name of the item.
In Word 2016, go to File > Options > Proofing > Autocorrect Options, as shown below.
The Autocorrect dialog box pops up, as shown below, with the selected text in the “With” box and the cursor in the “Replace box”.
Type something that you will remember for the name of the item, e.g., an abbreviation – in lowercase because that is quicker to type. It must be something that you will not use in normal typing. You do not want the name of the item appearing in the wrong place.
Select the “Formatted text” radio button.
The text in the “With” box changes to display the formatted version of the “With” text, as shown below.
Now, whenever you type the “Replace” name, it will be replaced by the “With” name in italics as soon as you press the spacebar or any kind of punctuation.
Microsoft Word’s unit of measurement follows the regional settings in Windows but can be changed in Word. Go to File – Options – Advanced – Display, as shown in the Word Options dialog box below.
You can have separate lists or tables of the figures, pictures, or tables in your Word document, similar to a table of contents. The default is a table of figures. But MS-Word can only generate a table of figures if you have previously inserted MS-Word’s captions to mark the figures. Click here to find out how to handle captions. This blog post tells you how to insert a table of figures and how to update it.
Inserting a Table of Figures
Put your cursor where you want your table of figures to be.
Go to the References tab, run your eye along the bottom of the ribbon to the Captions block, and click the Insert Table of Figures button. (Note: If your Word document is not maximized, the Insert Table of Figures option might not be visible. Some minimized views show only the Insert Table of Figuresicon.)
The Table of Figures dialog box pops up.
You can change the font and paragraph format by unticking the boxes on the face of the dialog box – but you do not usually need to untick any of them.
The Options… button. If you did not use the caption style for your figure captions, you can tell Word what style you did use by clicking on the Options… button. The Table of Figures Options dialog box pops up.
The Modify… button. Word uses the Table of Figures style for the entries in your list of figures. You can change the styles format by clicking on the Modify… button. The Style dialog box pops up, and asks you to select the appropriate style for your index or table entry. It has another Modify… button and, if you click on it, the usual Modify Style dialog box pops up.
Make the changes you want. I advise setting a left tab of about 2,5 cm.
Click the OK button or press the Enter key as many times as necessary to get out of the dialog boxes.
Word then searches the document for your captions and automatically adds a list of figures, sorted by figure number and page number.
Updating a table of figures
If you add, delete, change, or move captions, you need to update
the table of figures to reflect your changes:
Click in the table of figures in your document. The entire table will be highlighted.
Press F9 or click References > Update Table. (Note: Update Table only becomes an option when you have your cursor in the table of figures.)
The Update Table of Figures dialog box pops up.
Select Update page numbers if you need to adjust the page numbers.
Select Update entire table if you have moved figures or altered captions.
Click the OK button or press the Enter key.
Tip: Do not try to type changes in the table of figures. Make changes to the captions and then put your cursor in the table of figures and press F9 to make them reflect there.
A caption accompanies a figure, table, equation or other object, such as a box or a photograph. Figure captions are the default.
A caption usually has three components: a customisable label (like “Figure”, “Table”, “Equation”) plus an ordered number or letter that Word inserts for you (e.g., “1, 2, 3…” or “a, b, c…”), followed by a description.
The advantages to using MS-Word’s caption fields are that, if you add, delete, or move captions, you can easily update the caption numbers all at once; and that you can list the captioned items; for example, in a table of figures or a table of equations.
Click here to open a PDF of the instructions below – with illustrations.
Changing a caption
There are different ways of inserting captions and formatting them, which you get by selecting buttons in the dialog boxes. I suggest you explore them to see what suits you. You can:
If you have your cursor in the paragraph above or below the figure when you click on Insert Caption, the Position textbox is greyed out, and it is up to you to keep the figure and its caption on the same page.
(To keep the figure and its caption on the same page, put your cursor in the first paragraph, go to the Home tab > Paragraph group > dialog box launcher > Line and Page Breaks tab > tick the box labelled Keep With Next.)
Automatically positioning the figure and its caption
If you select the figure before you click on Insert Caption, the Position textbox is not greyed out, you can specify whether the caption is inserted above or below the figure.
To change the 1-2-3 numbers in figure labels to a-b-c or i-ii-iii, click on the Numbering button. The Caption Numbering dialog box pops up with the Format text box selected. Change the number by selecting from the Format drop-down list.
Including the heading number with the figure number
You can include the chapter, section or heading number with the figure number (e.g., Figure II-1, Table 1-A). To do this, tick the box labelled Include chapter number. The greyed-out items below it are activated:
Click the down-arrow on the right of the Chapter starts with style label to see a drop-down list of styles. Select the style of the heading whose number you want to include; and
Click the down-arrow on the right of the Use separator label to see a drop-down list of punctuation. Select the punctuation you want between the chapter number and the figure number
After you have added a caption to your document, there will be a Caption style in the style gallery.
To change the formatting of all the captions in your document, right-click the Caption style and choose Modify.
The Modify Style dialog box pops up, as shown below. Many modifications to the font and paragraph are available in the Formatting group, and the effect of a change is shown in the Sample text. More modifications can be made by clicking on the Format button at the bottom left of the dialog box.
Click here to find out how to list your figures in a table of figures.
MS-Word can add an automatic, updatable table of figures to your document.
But how? As my fellow editorsaid, “‘The last List of Figures I generated hyperlinked only one item on the list – the rest were not linked.”
This happened because MS-Word can only add a table of figures if you have previously inserted MS-Word’s captions to mark the figures. MS-Word can only ‘see’ its own captions; it does not detect manually inserted figure labels and so does not include them in the list of figures.
I have explained them in separate blog posts. One explains figure captions and the other explains how to list them in a table of figures. Click on the underlined words to go there.
Click here if you want to open a PDF that explains everything in one document- with illustrations.
A fellow editor asked, “Styles vary in order and appearance with some documents – I know how to modify their attributes, but how do I customise the ribbon?”
The appearance of the styles in Microsoft Word’s Styles Gallery is governed by the template in your current document. The order of the styles is governed by the priroty Word assigned to them.
It is possible to customise the order of the styles in the Styles Gallery and Styles Pane – but it is complicated, time-consuming and not worth the trouble. Tony Jollans wrote a very detailed article that explains why.
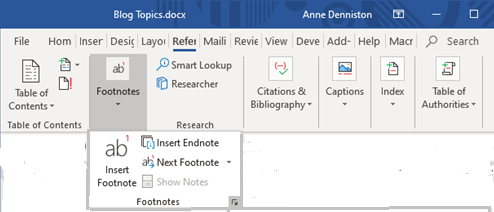
In Word, if your document has 12 footnotes, they are numbered from 1 to 12 by default – but you can change the way they are numbered. Word allows you to specify both a starting footnote number and whether the numbering restarts in each new section of your document. This is how you make the changes:
Select the References tab on the ribbon.
Go to the Footnotes group and click the small downward-pointing arrow at the bottom-right corner (called the dialog box launcher), as shown below.
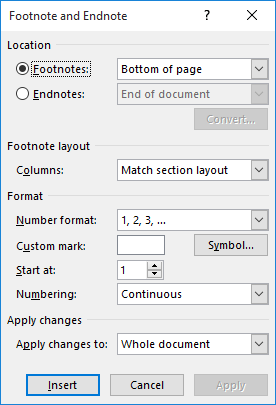
Word launches the Footnote and Endnote dialog box, shown below with the default options.
Make sure the Footnotes radio button is selected.
Change the Start At value to reflect where you want Word to start numbering.
Change the Numbering dropdown to reflect how you want Word to count your footnotes.
If you are setting things up for future footnotes, click on the Apply button and then the Cancel button, otherwise click the Insert button to add a footnote mark at the current document location.
Microsoft Word requires a section break when there is a change to page margins, orientation (portrait or landscape) or size, or to the footer or header.
How to set page layout
Go to the Insert tab, Page Layout group and select the dialog box launcher at the bottom-right of the group.
The Page Setup dialog box launcher
The Page Setup dialog box pops up, showing three tabs. Select the Layout tab (the one on the right).
The Layout tab is where you change:
the default type of section break in the document
the distance of headers and footers from the page edge
the vertical alignment of text (at the top, middle or bottom of the page)
Microsoft Word requires a section break when there is a change to page margins, orientation (portrait or landscape) or size, to footer contents or header contents.
How to set paper size
Go to the Insert tab, Page Layout group and select the dialog box launcher at the bottom-right of the group.
The Page Setup dialog box launcher
The Page Setup dialog box pops up, showing three tabs. Select the Paper tab (the middle one).
The default paper size when you buy a PC or laptop is “Letter”, used in the US. South Africans should change this to “A4”, as shown below.