A fellow editor asked, “Styles vary in order and appearance with some documents – I know how to modify their attributes, but how do I customise the ribbon?”
The appearance of the styles in Microsoft Word’s Styles Gallery is governed by the template in your current document. The order of the styles is governed by the priroty Word assigned to them.
It is possible to customise the order of the styles in the Styles Gallery and Styles Pane – but it is complicated, time-consuming and not worth the trouble. Tony Jollans wrote a very detailed article that explains why.
In Word, if your document has 12 footnotes, they are numbered from 1 to 12 by default – but you can change the way they are numbered. Word allows you to specify both a starting footnote number and whether the numbering restarts in each new section of your document. This is how you make the changes:
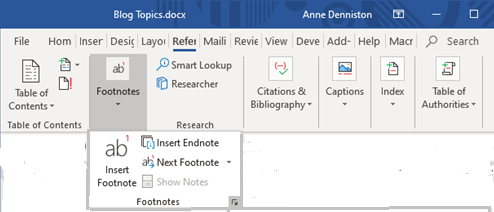
Select the References tab on the ribbon.
Go to the Footnotes group and click the small downward-pointing arrow at the bottom-right corner (called the dialog box launcher), as shown below.
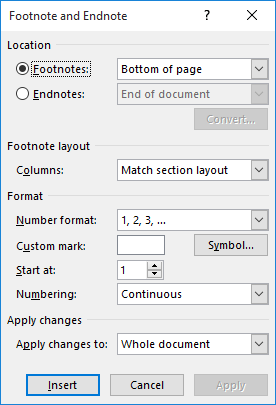
Word launches the Footnote and Endnote dialog box, shown below with the default options.
Make sure the Footnotes radio button is selected.
Change the Start At value to reflect where you want Word to start numbering.
Change the Numbering dropdown to reflect how you want Word to count your footnotes.
If you are setting things up for future footnotes, click on the Apply button and then the Cancel button, otherwise click the Insert button to add a footnote mark at the current document location.
Microsoft Word requires a section break when there is a change to page margins, orientation (portrait or landscape) or size, or to the footer or header.
How to set page layout
Go to the Insert tab, Page Layout group and select the dialog box launcher at the bottom-right of the group.
The Page Setup dialog box launcher
The Page Setup dialog box pops up, showing three tabs. Select the Layout tab (the one on the right).
The Layout tab is where you change:
the default type of section break in the document
the distance of headers and footers from the page edge
the vertical alignment of text (at the top, middle or bottom of the page)
Microsoft Word requires a section break when there is a change to page margins, orientation (portrait or landscape) or size, to footer contents or header contents.
How to set paper size
Go to the Insert tab, Page Layout group and select the dialog box launcher at the bottom-right of the group.
The Page Setup dialog box launcher
The Page Setup dialog box pops up, showing three tabs. Select the Paper tab (the middle one).
The default paper size when you buy a PC or laptop is “Letter”, used in the US. South Africans should change this to “A4”, as shown below.
Microsoft Word requires a section break when there is a change to page margins, orientation (portrait or landscape) or size, to footer contents or header contents.
How to set page margins
Go to the Insert tab, Page Layout group and select the dialog box launcher at the bottom-right of the group.
The Page Setup dialog box launcher
The Page Layout dialog box pops up. It has three tabs. When it first pops up, it displays the Margins tab shown below. The default margin sizes are 1.5 inches (2,54 cm) because that is the US preference. (Go here to find out how to change the unit of measurement.)
Changing top, bottom, left and right margins
Margins are measured from the page edge to the text edge.
If these are the margins settings you always use, click the “Set As Default” button.
Microsoft Word requires a section break when there is a change to page margins, orientation (portrait or landscape) or size, to footer contents or header contents.
How to set page orientation
Go to the Insert tab, Page Layout group, and select the dialog box launcher at the bottom-right of the group.
The Page Setup dialog box launcher
To set page orientation, go to the Layout tab, Page Setup group, Orientation option, and select “Portrait” or “Landscape” from the dropdown list.
Setting portrait or landscape orientation
Note: As the icons in the dropdown list above show, portrait pages are long and narrow, while landscape pages are wide and short.
Microsoft Word requires a section break when there is a change to page margins, orientation (portrait or landscape) or size, to footer contents or header contents.
How to insert a section break
Go to the Layout tab (formerly called a ‘menu’) on the Ribbon, Page Setup group (the group names are on the bottom of the Ribbon), Breaks option.
A fellow editor asked, “How do I make page numbering continuous after a section break in Microsoft Word?”
Continuous page numbering
With your cursor in the section where you want the page numbering to be continued, go to the Insert tab, Header & Footer group (on the far right), Page Number option, as shown below in Figure 1.
Figure 1. Page numbers
In the dropdown list, select Format Page Numbers…, as shown below in Figure 2.
Figure 2. Format page numbers
In the Page Number Format dialog box, Page numbering group, select the “Continue from previous section” radio button, as shown below in Figure 3.
Figure 3. Continue from previous section
The section’s page numbers will now continue from the previous section, i.e., the section’s first page number will be one higher than the last page number in the previous section.
Note: You can also set the starting page number to whatever you like, and you can make the section heading number show with the page number, with whatever separator you want between the section number and the page number.
Isn’t it simple when you know how!
Microsoft Word requires a section break when there is a change to page margins, orientation or size, or to the footer or header.
Readers like to have their text broken up by subheadings into bite-sized chunks for easy digestion and scanning so I add lots of subheadings.
The subheadings are reflected in the table of contents, where your readers can see an overview of your argument and logic.
Beginning, middle and end
All the way through a document, you should tell the reader what the next chapter, section or subsection will cover, then you must say what you said you would say, and at the end of each section, you should summarise what you said. Each reiteration reinforces your argument.
Learning by repetition
Reading a document is actually a learning process, and human beings learn by repetition, building on what they knew before. The table of contents and the list at the beginning of each section both introduce a new idea, the middle of the section explains it, and the summary clarifies it.
By the time they read the concluding summary, your readers will have learned something new.
Understanding brings acceptance
Your readers are your target audience. They may be examiners, customers, strangers, pupils, colleagues, friends… Your document has to make sense to them. If they can understand it, they can accept it. You have made your point.
Microsoft Word can add an automatic, updatable table of contents (TOC) to your document – but only if your headings have a style applied.
Heading 1
Apply the Heading 1 style to your main headings by putting your cursor in them and pressing Ctrl+alt+1. The heading above this paragraph is in Heading 1 style. I will tell you another time how to change what a style looks like.
Heading 2
Apply Heading 2 style to sub-headings that fall under a heading level 1 by putting your cursor in them and pressing Ctrl+alt+2. The heading above this paragraph is in Heading 2 style.
Heading 3
If there is any sub-heading under a Heading 2 heading, apply Heading 3 style by putting your cursor in it and pressing Ctrl+alt+3. The heading above this paragraph is in Heading 2 style.
Put your cursor in each paragraph, and look at Home > Styles. You will see the relevant style name with a block around it. You can also apply the style by putting your cursor in a paragraph and choosing from Home > Styles.
Put your cursor where you want your TOC to be.
Go to the References tab, look to the far left and click on Table of Contents > Automatic Table 1. Word will insert a TOC called “Table of Contents” showing heading levels 1-3.
To update it, put your cursor in the TOC and press F9. Do not try to type in changes in the TOC. make changes to the actual headings and then press F9 in the TOC.