MSWord Options 2 – Display field shading

Options – Display grey field shading

The Collins Dictionary says “A field is an area of a computer’s memory or a program where data can be entered, edited, or stored.” MSWord has fields such as date and author fields that it stores in its File Properties.

You cannot change the text in a field because it changes back as soon as you print the document.  You therefore need to be able to see fields so that you do not change them by mistake.  Word allows you to display the fields with a grey highlight.  In order to do so:

  1. Go to the File tab and select the Options button.
  2. In the left pane of the Word Options dialog box, select the Advanced option.
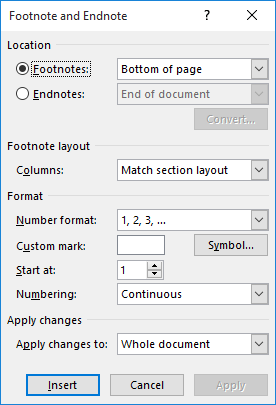
  3. In the right pane, under the heading, Show document content, change the Field Shading to “Always”, as shown below:
Word Options dialog box - Advanced > Show document content
Word Options > Advanced > Show document content

If you want to change a field in the text, you must first “lock” it (Ctrl+Shift+F9) and then make your change

OR

Go to the Properties pane where the field originates and change the text there.  Go to the File tab, Info option to see the Properties pane on the right. Click in a field in the right-hand column of the Properties pane to add or change text.

If you cannot see the property you want, click Show All Properties, as shown below.

Word Options > Info > Properties > Show All Properties

Six more properties are displayed, as shown below, highlighted by an orange border.

The Properties pane has two columns. The fields are in the right-hand column and the field names are on the left.

Click here for a PDF of this lesson.
Go back to the top
Go to the Manual contents
Go to the previous lesson
– See hidden text
Go to the next lesson – Personalise Display settings

MSWord Options 1 – See hidden text

OptionsSee hidden text

To see section breaks, paragraph breaks, page breaks, tabs and spaces:

1. Click on the File tab.

2. Click on the Options option (at the bottom left).

3. In the left pane of the Word Options dialog box, select the Display option.

The Word Options dialog box >  Display option
The Word Options dialog box > Display option

4. In the right pane, under the second heading, Always show these formatting marks on the screen, tick the box on the left of Show all formatting marks.

5. Do this whenever you are troubleshooting.

TIP  You can quickly toggle this option on or off by clicking the Show/Hide icon (which depicts a paragraph break symbol [called a pilcrow] – ¶) in the Paragraph group of the Home tab (or pressing the shortcut, Ctrl+shift+8).

Click here to download a PDF of this lesson.
Go back to the top
Go to the Manual contents
Go to the previous lesson
– Navigation around a document
Go to the next lesson – See field shading

Section Breaks 6 – Footnotes

Section Breaks, Part 6

How to restart footnotes at 1 in each section

In Word, if your document has 12 footnotes, they are numbered from 1 to 12 by default – but you can change the way they are numbered. Word allows you to specify both a starting footnote number and whether the numbering restarts in each new section of your document. This is how you make the changes:

  1. Select the References tab on the ribbon.
  2. Go to the Footnotes group and click the small downward-pointing arrow at the bottom-right corner (called the dialog box launcher), as shown below.
  3. Word launches the Footnote and Endnote dialog box, shown below with the default options.
  4. Make sure the Footnotes radio button is selected.
  5. Change the Start At value to reflect where you want Word to start numbering.
  6. Change the Numbering dropdown to reflect how you want Word to count your footnotes.
  7. If you are setting things up for future footnotes, click on the Apply button and then the Cancel button, otherwise click the Insert button to add a footnote mark at the current document location.

Section Breaks 5 – Page layout

Section Breaks, Part 5

Microsoft Word requires a section break when there is a change to page margins, orientation (portrait or landscape) or size, or to the footer or header.

How to set page layout

Go to the Insert tab, Page Layout group and select the dialog box launcher at the bottom-right of the group.

The Page Setup dialog box launcher

The Page Setup dialog box pops up, showing three tabs. Select the Layout tab (the one on the right).

The Layout tab  is where you change:

  • the default type of section break in the document
  • the distance of headers and footers from the page edge
  • the vertical alignment of text (at the top, middle or bottom of the page)
  •  line numbers
  • borders.
The Layout tab on the Page Setup dialog box

  • Go here to find out how to insert a section break
  • Go here to find out how to set page orientation
  • Go here to find out how to set page margins
  • Go here to find out how to set paper size
  • Go here to find out how to make the page numbering continuous.

Section Breaks 4 – Paper size

Section Breaks, Part 4

Microsoft Word requires a section break when there is a change to page margins, orientation (portrait or landscape) or size, to footer contents or header contents.

How to set paper size

Go to the Insert tab, Page Layout group and select the dialog box launcher at the bottom-right of the group.

The Page Setup dialog box launcher

The Page Setup dialog box pops up, showing three tabs. Select the Paper tab (the middle one).

The default paper size when you buy a PC or laptop is “Letter”, used in the US. South Africans should change this to “A4”, as shown below.

The Paper tab on the Page Setup dialog box

  • Go here to find out how to insert a section break
  • Go here to find out how to set page orientation
  • Go here to find out how to set page margins
  • Go here to find out how to set paper layout
  • Go here to find out how to make the page numbering continuous.

Section Breaks 2 – Page orientation

Section Breaks, Part 2

Microsoft Word requires a section break when there is a change to page margins, orientation (portrait or landscape) or size, to footer contents or header contents.

How to set page orientation

Go to the Insert tab, Page Layout group, and select the dialog box launcher at the bottom-right of the group.

The Page Setup dialog box launcher

To set page orientation, go to the Layout tab, Page Setup group, Orientation option, and select “Portrait” or “Landscape” from the dropdown list.

Layout - Page Setup - Orientation
Setting portrait or landscape orientation

Note: As the icons in the dropdown list above show, portrait pages are long and narrow, while landscape pages are wide and short.


  • Go here to find out how to insert a section break
  • Go here to find out how to set page margins
  • Go here to find out how to set paper size
  • Go here to find out how to set paper layout
  • Go here to find out how to make the page numbering continuous.

Section Breaks 7 – Continuous page numbering

Section Breaks, Part 7

A fellow editor asked, “How do I make page numbering continuous after a section break in Microsoft Word?” 

Continuous page numbering

With your cursor in the section where you want the page numbering to be continued, go to the Insert tab, Header & Footer group (on the far right), Page Number option, as shown below in Figure 1.

Insert - Header & Footer - Page Number
Figure 1. Page numbers

In the dropdown list, select Format Page Numbers…, as shown below in Figure 2.

Insert - Headers & Footers - Page Number - Format Page Numbers
Figure 2. Format page numbers

In the Page Number Format dialog box, Page numbering group, select the “Continue from previous section” radio button, as shown below in Figure 3.

The Page Number Format dialog box
Figure 3. Continue from previous section

The section’s page numbers will now continue from the previous section, i.e., the section’s first page number will be one higher than the last page number in the previous section.

Note: You can also set the starting page number to whatever you like, and you can make the section heading number show with the page number, with whatever separator you want between the section number and the page number.

Isn’t it simple when you know how!


Microsoft Word requires a section break when there is a change to page margins, orientation or size, or to the footer or header.

  • Go here to find out how to insert a section break
  • Go here to find out how to set page orientation (portrait or landscape)
  • Go here to find out how to set page margins
  • Go here to find out how to set paper size
  • Go here to find out how to set page layout.

Back to top

If you would like to have a document edited, click here.
If you would like to have a document formatted, click here.